
Slayer is a skill that allows players to kill monsters which are otherwise immune to damage. Slayer experience is awarded upon killing a monster and is similar to its number of hitpoints. Combat experience is also given at its standard rate, so many players primarily train combat by completing Slayer tasks. The skill is an exclusive means for many powerful items to enter the game.
As of December 12th, 2013, players can earn Slayer points by completing assigned tasks.
Introduction
To receive a Slayer task, players must visit one of six Slayer masters throughout RuneScape. All but the first Slayer master have a Combat level requirement, and only the final Slayer master also has a Slayer level requirement. The tasks assigned are generally appropriate for the Combat level of the player, assuming he or she uses the highest level master available. Players may be assigned a task which requires the use of Slayer-specific items to deal damage or a killing hit; in addition, some monsters require the player to use special armour to prevent stat reduction. Other assignable monsters are those which do not require a minimum Slayer level or materials to kill, and are otherwise normal monsters.
All slayer masters sell the same batch of slayer equipment which is necessary to kill certain slayer monsters. When you get your task, you can ask the master for advice on killing the assigned monsters, they will tell you if special equipment is required. If there is no equipment necessary they will give you some other tip such as: this monster is weak to poison/magic. However, it is agreed by many slayers that asking for information isn't very useful.
One of the things the masters sell is an enchanted gem, once you start training (this involves some begging from your chosen master) you get one for free, afterwards you buy them for 1 coin each. These allow you to contact your slayer master, ask for tips, ask who the master is and where they are located, and most importantly see how many monsters you still have to kill. The gems cannot be used to get a new assignment, for that you must see a master in person. An alternative to the gem is a worn bracelet of combat, which will update the player every 10 kills.
Players who have unlocked the Lunar Spells can also use the spell NPC Contact in order to receive a new assignment from a slayer master of their choosing. The slayer gems automatically put you through to the slayer master who will be best for training you, this may not be the one who gave you the assignment. It is advised to use the master the slayer gems contact you to.
The masters vary in the level of difficulty of their assignments, two of them require certain combat levels before you may get assignments from them. If you go to a slayer master that is too hard for you, the master in Burthorpe may consider giving you an easier assignment if you talk to him. However, this only works if the assignment is something that he doesn't assign. For example, if Duradel assigns you Desert lizards, then the Burthorpe slayer master cannot change your task, as he too assigns Desert Lizards. All slayer masters can assign the same monsters as the masters below them, however as their difficulty increases there is a substantially higher chance of getting a more difficult monster. The masters are shown on the map with a yellow skull File:Slayer master icon.png icon.
Note: Skipping assignments through Turael is not a recommended choice anymore, as it's better to gain slayer points from doing tasks in a row and spending it on blocking or skipping your current task without breaking your task streak, as slayer points also allow you to buy useful items and perks.
Slayer masters
A handful of slayer masters dot the map; each master gives assignments oriented towards a general range of combat levels.
Turael
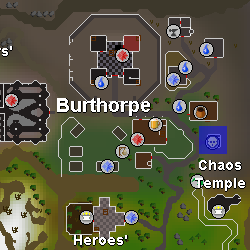
The location of Turael.
- Southeast Burthorpe - Games Necklace teleport or Hot-air balloon
Requires: Combat level 3
His assignments are simple, small, and easy to find. These assignments are excellent for the slayer with a low combat level such as 3, but his assignments yield such low experience that most players will find him unsatisfactory. However, Turael is willing to replace an assignment given by another slayer master if the task wouldn't normally be given by him (for example he won't give another task instead of killing crawling hands). This ability results in more players using his services than normally would.
Mazchna
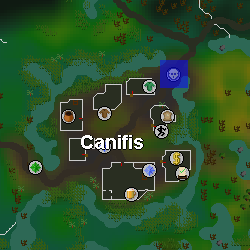
The location of Mazchna.
- Northeast Canifis on the bridge - Ectophial, fairy ring CKS or Kharyll Teleport (can be via house)
- Requires: Combat level 20
Mazchna gives fairly easy assignments too, but sometimes he may give a very small amount of more difficult monsters. Mazchna also has the habit of giving assignments which can be completed very close to him, making it convenient to get new assignments once completed. He requires a combat level of 20 and Priest in Peril complete.
Vannaka

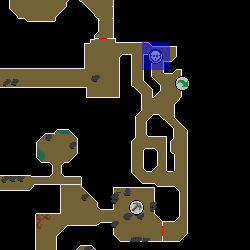
The location of Vannaka.
- Edgeville dungeon, east of the Wilderness gate - Padewwa Teleport or Amulet of Glory
Requires: Combat level 40
Vannaka is one of the most popular slayer masters. His assignments are usually suitable for slayers with medium and even high combat skills with a starting combat level of 40 for him to assign you a task. He can also be found on tutorial island where he teaches players how to use melee and ranged combat. He is the only slayer master to assign Terror Dogs.
Chaeldar

The location of Chaeldar.
- Zanaris fairy queen's court - fairy ring hub
- Requires: Combat level 70
Chaeldar will only give assignments to players over a combat level of 70. She gives out the third toughest slayer assignments in the game. It is recommended that a person over a combat level of 70 should use Chaeldar as their slayer master.
She is infamous for sometimes handing out annoying tasks, such as Turoths and Kurasks, which many players choose to skip.
Nieve
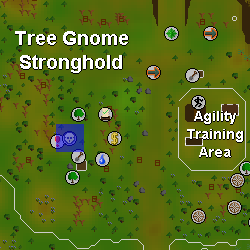
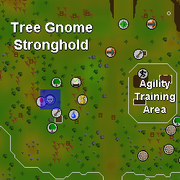
The location of Nieve.

- Tree Gnome Stronghold, near the magic trees and the Southern bank.
Requires: Combat level 85 Her task list is based roughly on the assignments offered by Sumona in Runescape 3. You need a combat level of 85 to get a task from her, otherwise she will refuse to give you a task.
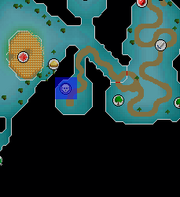
Duradel

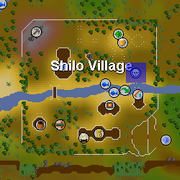
The location of Duradel.
- Shilo Village, top floor of the fishing store - fairy ring CKR, gnome glider, karamja gloves 3 or wheelbarrow cart
Requires: Combat level 100 & Slayer level 50 Duradel is the most difficult slayer master. He refuses to give assignments to players until they have 100 Combat and 50 Slayer. His assignments are generally high-levelled demons, dragons, and slayer monsters such as abyssal demons.
Slayer equipment
| Item | Buy | Sell |
|---|---|---|
| Enchanted gem | 1 | Can't sell |
| Mirror shield | 5000 | 3000 |
| Leaf-bladed spear | 31,000 | Can't sell |
| Broad arrows | 60 | Can't sell |
| Bag of salt | 10 | |
| Rock hammer | 500 | |
| Facemask | 200 | |
| Earmuffs | 200 | 120 |
| Nose peg | 200 | 120 |
| Slayer's staff | 21,000 | |
| Spiny helmet | 650 | |
| Fishing explosive | 60 | |
| Ice cooler | 1 | |
| Slayer gloves | 200 | Can't sell |
| Unlit bug lantern | 130 | 78 |
| Insulated boots | 200 | 120 |
| Fungicide spray | 300 | |
| Fungicide | 10 | |
| Witchwood icon | 900 | |
| Slayer bell | 150 |
Slayer monsters
Slayer-exclusive monsters
Some monsters can ONLY be killed once players have reached a certain level in Slayer. Not all of them require special equipment.
Where to slay monsters for best results
Beginner Training
Note: This beginner's training guide assumes that you either are a low-level player or a player who cannot afford Guthan's. This guide assumes that you have the best equipment you can afford. Upon completion of the Varrock quiz from level 1 Slayer, you can get to level 9 with the 1000 XP it offers. Completion of the Wanted! quest can award you 5000 slayer XP, which can lvl your slayer from 1-20 (if you never started slayer yet), as there is no slayer requirement to do the quest.
Quests
Essential
The following quests are essential to do, mainly because they give access to either more slayer monsters or make slaying easier. Some of these may be taken out, depending on your combat level.
- Cabin Fever- Access to Mos Le'Harmless to fight Jungle and Cave Horrors.
- Death to the Dorgeshuun- Access to Molanisks.
- Desert Treasure- Access to Dust Devils, and Ancient Magicks for getting around.
- Dwarf Cannon- Allowed to use Dwarf Multicannon.
- Ernest the Chicken- Access to Killerwatts
- A Fairy Tale Part II- Access to Fairy Ring teleportation system and Goraks.
- Ghosts Ahoy- Ectophial, which gives a quick teleport to the Slayer Tower.
- Horror from the Deep- Access to Dagannoths and prayer books.
- Lost City- Access to Chaeldar.
- Lunar Diplomacy- Access to Suqahs.
- Mourning's Ends Part I- Tiny Elf Crystal allows you fast access to Elves and Bears.
- Olaf's Quest- Access to Brine rats.
- Rum Deal- Access to Fever Spiders.
- Shilo Village Quest- Access to Duradel.
Recommended
These quests are recommended as they only make slaying easier. Like the essential quests, some of these may be taken out if you have a low combat level.
- Dragon Slayer- Access to Melzar's Maze's Ghosts.
- Dream Mentor- Access to level 96 Spell Book Swap and efficient use of lunars for Slayer.
- Elemental Workshop- Allowed to use Elemental shield, required against Skeletal Wyverns.
- Enakhra's Lament- Camulet allows easy access to switching between Ancient and Regular Magics.
- The Fremennik Trials- You make the Enchanted Lyre which gives you a faster route to the Slayer Dungeon.
- Garden of Tranquility- Ring of Charos (a) allows you cheap travel and lets you enchant Lyres for a raw bass.
- The Grand Tree- Access to Gnome Glider.
- The Lost Tribe- Quicker access to Lumbridge swamp caves for Cave Bugs, Cave Slime, and Wall Beasts. Also unlocks quick route to Juna from Tears of Guthix.
- One Small Favor- Key ring makes finding your keys without hassle.
- Roving Elves- Needed for Mournings End, but specifically allows you access to the Crystal bow. Essential when ranging Abyssal Demons.
- Rune Mysteries and Abyssal Runecrafting Mini Game- Quick access to nature altar outside of which has many monkeys to kill.
- Tears of Guthix- Free experience once a week if Slayer is your lowest skill.
- Watchtower- Fast access to Blue Dragons and caged Greater Demons.
Skills
These skills are aimed at lower levels. Higher levels, please see the skill chart on the Advanced Training section.
| Skill | Required | Recommended |
|---|---|---|
| Attack | 40 | 50+ |
| Strength | 40 | 50+ |
| Defence | 40 | 50+ |
| Magic | 55 | 67 for the NPC contact Lunar spell, 96 for the Spell Book Swap Lunar spell (assuming that you have completed Lunar Diplomacy) |
| Range | 50 | 70 for full black dragonhide |
| Agility | - | 81 for all Slayer related shortcuts, 78 with Agility potion |
| Prayer | 43 | 70 for power-slaying with Piety |
| Fishing/Cooking | - | 76/80 for sharks, higher if possible. You also use cooking to make Slayer's Respite and Wild Pie. |
| Herblore | - | 72 so you can make your own ranging potions. |
| Farming | - | 79 so you can grow your own dwarf weed. |
| Construction | - | 55 so you can repair barrows armour in your house (assuming you have barrows armour to repair) |
Items
Essential
- Plenty of food such as lobster, swordfish, and/or monkfish. You can use sharks, although monkfish is highly suggested, being easy to purchase and healing a significant 16 hitpoints.
- Combat potions to kill monsters faster
- Full rune or better
- Full blue dragonhide or better
- Amulet of glory for stats and teleports. Multiple may be needed if you cannot access the Heroes' Guild.
- Games necklaces for a quick teleport to Turael.
- At least a rune scimitar. A dragon scimitar would be better, as expected. An Abyssal whip would be even better, assuming you have the money and stats.
- A lot of teleport runes. Since you don't have Guthan's equipment to heal you, you'll have to bank on a lot of trips. You can use one-click teleports as well, such as the Ectophial or the Tiny elf crystal.
Recommended
- Dwarf multicannon. It makes tasks significantly easier and faster, although a lot more expensive. It would take around 300,000 cannonballs to get 99 Slayer.
- 300-400 Prayer potions.
- Black mask. Charges aren't necessary. The Black Mask will greatly help you in slaying, as it gives a 15% increase to strength and attack during your task.
- Amulet of fury, if it can be afforded.
- Any melee barrows set. This is assuming that you can afford Torag's, but cannot afford Guthan's.
- Fighter torso
- Rune defender, if you have the proper levels to gain entrance to the Warrior's Guild.
- Full black dragonhide
- Crystal bow with recharge cost down to 180k. This is assuming that you have completed Roving Elves.
- Holy book (Saradomin book)
- Bones to Peaches, obtained from the Mage Training Arena
- Full Initiate or Proselyte for their prayer boost.
Strategy
Since you do not have Guthan's to heal, your priority will be to kill as many of your assigned monsters as possible before having to bank for food. There are a few ways you can kill more monsters per trip.
- Use the cannon when necessary. Do not use it in single-combat areas where there are no safespots and the monsters are spaced out. You should save your cannonballs for tasks that are in multi-combat areas, such as Kalphites and Dagannoths. You cannot use your cannon in the Slayer Tower nor in the Slayer Dungeon.
- Use Vannaka under Edgeville. If you feel that you are up to it and have completed Lost City, you can try Chaeldar. If you're a high level without Guthan's, you can try Duradel, but expect a lot more bank runs during your tasks.
- To easily reach Vannaka, use your Amulet of glory to teleport to Edgeville. The dungeon where he is located is easily reachable from there.
- Accept the tasks that are given to you, unless you feel that you can't do it. In that case, change tasks.
Equipment and set-up
Generally, you'll be using melee for a lot of your tasks. This chart will give you a general idea for what to wear. Any cape and gloves may be used. It is suggested to wear an obsidian cape and any gloves from Recipe for Disaster.
| Attack style | Monster examples | Basic Equipment set | Advanced equipment set |
|---|---|---|---|
| Melee attack | Gargoyles, Trolls, etc. | Rune platebody, Rune platelegs, Berserker helm, Amulet of glory, Rune kiteshield, Rune boots, melee weapon | Torags platebody and Torags platelegs, along with higher level equipment (Amulet of fury, FIghter torso, etc.) |
| Magic-based melee attack | Banshees, Pyrefiends, Cave horrors, etc. | Blue dragonhide body and chaps, Amulet of glory, melee weapon, Holy book or elemental shield, Elemental helm, snakeskin or ranger boots | Substitute blue dragonhide for black dragonhide. Wear a black mask. |
| Magic attack | Aberrant Specters | Same as Magic-based melee attack | - |
| Ranged attack | Dagannoths | Same as Melee attack | Same as melee attack |
| Dragon | green,blue,red,black | You can melee Green Dragons using just rune plate and legs. Range Blue Dragons using a Magic shortbow | You can use a Crystal bow or knives. You can also melee blue dragons. |
| Dragon | bronze,iron,steel | You should change these tasks if you are a lower level. For higher levels, you should wear your best prayer boosting gear and melee them while using prayer. You can also mage them using Anti-fire potions | - |
Your inventory should include the Slayer gem and a teleport to the closest bank. It is recommended to bring a few alching runes as well as bones to peaches runes. You should then fill the rest of your inventory with food, leaving 2 to 4 spaces open for drops.
Advanced Training
Note:This advanced training guide assumes that you are an above average player with decent skills, have plenty of cash (or the ability to make plenty of cash), and don't mind training slayer with little profit.
Quests
Essential
The following quests are essential to do, mainly because they give access to either more slayer monsters or make slaying easier.
- Cabin Fever- Access to Mos Le'Harmless to fight Jungle and Cave Horrors.
- Death to the Dorgeshuun- Access to Molanisks.
- Desert Treasure- Access to Dust Devils, and Ancient Magicks for getting around.
- Dwarf Cannon- Allowed to use Dwarf Multicannon.
- Ernest the Chicken- Access to Killerwatts
- A Fairy Tale Part II- Access to Fairy Ring teleportation system and Goraks.
- Ghosts Ahoy- Ectophial, which gives a quick teleport to the Slayer Tower.
- Horror from the Deep- Access to Dagannoths and prayer books.
- Lost City- Access to Chaeldar.
- Lunar Diplomacy- Access to Suqahs.
- Mourning's Ends Part I- Tiny Elf Crystal allows you fast access to Elves and Bears.
- Olaf's Quest- Access to Brine rats.
- Rum Deal- Access to Fever Spiders.
- Shilo Village Quest- Access to Duradel.
Recommended
These quests are recommended as they only make slaying easier.
- Dragon Slayer- Access to Melzar's Maze's Ghosts.
- Dream Mentor- Access to level 96 Spell Book Swap and efficient use of lunars for Slayer.
- Elemental Workshop- Allowed to use Elemental shield, required against Skeletal Wyverns.
- Enakhra's Lament- Camulet allows easy access to switching between Ancient and Regular Magics.
- The Fremennik Trials- You make the Enchanted Lyre which gives you a faster route to the Slayer Dungeon.
- Garden of Tranquility- Ring of Charos (a) allows you cheap travel and lets you enchant Lyres for a raw bass.
- The Grand Tree- Access to Gnome Glider.
- The Lost Tribe- Quicker access to Lumbridge swamp caves for Cave Bugs, Cave Slime, and Wall Beasts. Also unlocks quick route to Juna from Tears of Guthix.
- One Small Favor- Key ring makes finding your keys without hassle.
- Roving Elves- Needed for Mournings End, but specifically allows you access to the Crystal bow. Essential when ranging Abyssal Demons.
- Rune Mysteries and Abyssal Runecrafting Mini Game- Quick access to nature altar outside of which has many monkeys to kill.
- Tears of Guthix- Free experience once a week if Slayer is your lowest skill.
- Watchtower- Fast access to Blue Dragons and caged Greater Demons.
- Slug Menace- Access to Prosylte Armour
Skills
| Skill | Required | Recommended |
|---|---|---|
| Attack | 70 | 80+ |
| Strength | 70 | 80+ |
| Defence | 70 | 80+ |
| Magic | 55 | 67 for the NPC contact Lunar spell, 96 for the Spell Book Swap Lunar spell |
| Range | - | 70 for full black dragonhide |
| Agility | - | 81 for all Slayer related shortcuts, 78 with Agility potion |
| Prayer | 43 | 70 for power-slaying with Piety |
| Fishing/Cooking | - | 76/80 for sharks, higher if possible. You also use cooking to make Slayer's Respite and Wild Pie. |
| Herblore | - | 72 so you can make your own ranging potions. |
| Farming | - | 79 so you can grow your own dwarf weed. |
| Construction | - | 55 so you can repair barrows armour in your house. |
Items
Essential:
- Full Guthans
- Dramen staff or Lunar staff.
- Plenty of Amulets of glory
- Plenty of Games necklaces.
- Super sets 1
- Ranging potions
- Plenty of good food, at least lobsters or better. Suggested: monkfish, because they're easy to fish or buy, and sharks for the hard tasks.
- Dwarf multicannon and plenty of cannonballs or the money to buy lots of them. Cannonballs will be your most major expense whilst training Slayer. You will use about 300,000 cannonballs getting 99 Slayer.
- 300-400 Prayer potions.
- Full proselyte armour.
- Full rune or better.
- Full black d'hide armour (or the best you can wear).
- Good melee weapon such as an abyssal whip, or a dragon scimitar for those with less money.
- Plenty of starting cash, at least 1 million is suggested.
- Black mask (charges aren't necessary).
1: It is possible to substitute super defence with Excalibur which has a +10% defence bonus as its special.
Recommended:
- Dharok's if you have prayer potions to burn
- Fighter torso
- Amulet of Fury
- Fire cape
- Clue hunting apparatus - spade, watch, sextant, chart, anti-poison potions, and food.
- Energy potions or Super energy potions.
- Crystal bow with recharge cost at 180k. May be substituted with a Dark bow, if you have the cash for arrows and the bow itself.
- Item merchants that will take drops off your hands cheaply and quickly to resell.
- Bones to Peaches spell.
- Saradomin book
- Barrows gloves, available after completing Recipe for Disaster
- Rune defender
- a Ring of Wealth is entirely optional, but if you are only training slayer for the drops, then it is highly suggested that you wear one. Using a Berserker ring or a Warrior ring is a lot better for those who are slaying to level.
Strategy
Ideally, you want to get to your set task, and stay there until the task is complete. If you wish to break-even (or better) whilst training slayer, complete any clue scrolls that are dropped. It is recommended that you use high alchemy on most of the dropped items, alching anything above a steel battleaxe. Generally, you get as many nature runes as you need whilst training slayer for you to be able to alch comfortably.
- Use a cannon on every task where it reasonable to do so. This means that not only multi-combat area monsters should be targeted, but if there is a safe spot, you can also set up a cannon there, and only leave the safe spot to refill the cannon whilst it's doing its work. Examples of monsters that may be cannoned that aren't in a multi-combat area are hellhounds and fire giants.
- Cannons cannot be used in the Slayer Tower nor in the Slayer Dungeon
- It is not recommended make your own cannonballs, as they give low smithing exp and very slow to make.
- Use Chaeldar in Zanaris. Once you hit 50 slayer and 100 combat, you can use Duradel in Shilo Village, although it is recommended that you do not use Duradel until you hit 70 slayer, as then he can assign some of the better tasks to you, such as Dust Devils and Jellies.
- Having lunar spells set may be a reasonable strategy if you don't mind not alching some of the drops and are able to complete a task in one go, you should have plenty of bank space to alch drops later, and plenty of teleport tablets. It allows you to contact the slayer masters without having to visit them in person.
- To get a new task, glory teleport to Edgeville, go east across the river with your dramen or lunar staff to the fairy ring, and run north to Chaeldar.
- You should use potions frequently (super set, range potion) whilst training slayer.
- Slayer Tower tasks - bank at edgeville as necessary, then use the fairy ring code CKS to get there.
- Slayer Dungeon tasks - bank at edgeville as necessary, use fairy ring code AJR to get there, use a super energy potion when your tasks is deep in the dungeon, unless you have 78+ agility for the shortcut.
- In general, accept the task you're given, except in the cases noted below.
- Always take some cash to the slayer master (100k recommended), so you can buy any necessary items.
- For the highly advanced players: If you really want to spend a lot of money on it, then you could do the following:
- Have lunar spells set, use NPC Contact, and only do cannon tasks, changing all ones where you can't.
- Using prayer potions and Dharok's would be extremely fast experience too, but expensive.
- Hire fellow players that you can kill-steal from. In theory, you could get a significant amount of slayer exp if other players reduce monsters of your task to a small amount of hitpoints, then run away so you can get the kill - you only get half the slayer experience when doing this, but this is offset by the speed that the experience is gained.
Equipment and attack-styles
Your choice of equipment should be based on the monster's attack style. By keeping the customary "sets" that you will need together in the bank, it will speed up moving from one task to the next. This may involve buying 2 sets of the required items, which can be expensive. For the vast majority of players, melee is the best option for most tasks, though there are a few notable exceptions.
| Attack style | Monster examples | Basic Equipment set | Advanced equipment set |
|---|---|---|---|
| Melee attack | Gargoyles, Trolls, etc. | Rune plate, rune legs, rune defender, black mask, whip, barrows gloves, cape of achievement or obsidian cape, rune boots | Guthans for healing, Torags legs/plate for when you don't need to heal and fire cape. |
| Magic-based melee attack | Banshees, Pyrefiends, Cave horrors, etc. | Black dragonhide body and chaps, whip, saradomin book or rune defender, black mask, barrows gloves, snakeskin or ranger boots | If you have high health and magic, you could try to use full guthan's to heal. |
| Magic attack | Aberrant spectres | Same as Magic-based melee attack | Full proselyte, saradomin sword or abyssal whip and defender, slayer helmet, half or full inventory of prayer pots. |
| Ranged attack | Dagannoths | Full rune, whip | - |
| Dragon | green,blue,red,black | Range, crystal bow or knives recommended | - |
| Dragon | bronze,iron,steel | Mage, wearing full splitbark or better, and Magic dart or better spell to kill, whilst using anti-firebreath potions and a dragonfire shield. | Barrows armour or full bandos, slayer helmet, zamorakian hasta, dragonfire shield with antifire potions and a few rows of prayer pots. |
Maxium slayer / Slayer obsessive
Note: This may require new account.High level items and lots of money.
Quests (which you don't do)
Do NOT do! Why? Quests will unlock monsters to slay which are bad for xp gains, time and overall slaying. Mainly focussing on Duradel as the slayer master.
- Cabin Fever- Access to Mos Le'Harmless to fight Jungle and Cave Horrors.
- Death to the Dorgeshuun- Access to Molanisks.
- A Fairy Tale Part II- Access to Fairy Ring teleportation system and Goraks.
- Olaf's Quest- Access to brine rats
- Rum Deal- Access to Fever spiders
- Mogre miniquest - Access to Mogres
- Rag and bone man - Access to Mogres
Skills
| Skill | Required | Recommended |
|---|---|---|
| Attack | 60 | 75+ |
| Strength | 60 | 70+ |
| Defence | 40 | 85+ |
| Hitpoints | 60 | 70 Access to Zamorak's Fortress |
| Magic | 61 | 67 for the NPC contact Lunar spell, 96 for the Spell Book Swap Lunar spell |
| Range | - | 70 for full black dragonhide |
| Agility | - | 81 for all Slayer related shortcuts, 78 with Agility potion |
| Prayer | 43 | 70 for power-slaying with Piety |
| Farming | - | 99 for three extra spirit trees |
| Construction | - | 55 so you can repair barrows armour in your house. |
| Other skills | - | High enough for Quest requiments |
Items
Essential:
- Guthan's equipment
- Dramen staff or [Lunar staff]].
- Plenty of Amulets of glory
- Plenty of Games necklaces.
- Plenty of Slayer rings
- Runes
- Super sets 1
- Ranging potions
- Plenty of good food and potions
- Dwarf multicannon and plenty of cannonballs or the money to buy lots of them. Cannonballs will be your most major expense whilst training Slayer. You will use about 300,000 cannonballs getting 99 Slayer.
- Prayer potions
- Initiate armour or Proselyte armour
- Rune armour or better
- Full Black dragonhide armour
- Abyssal whip, Zamorakkian hasta, Dragonfire shield
- Plenty of starting Coins and items, Such as Cannonballs.
- Black mask/Slayer helm
Ideal gear
Max Strength bonus gear
Max Prayer bonus gear
Such as:
- Salve amulet (e)
- Amulet of fury
- Fire cape
- Saradomin godsword
- Armadyl crossbow
- Odium Ward
- Abyssal whip
- Zamorakian hasta
- Dragonfire shield
- Rune defender
- Berserker ring (i) (and other Dagannoth King rings imbued)
- Slayer helm (i)
- Proselyte armour
- Barrows armour
- Dwarf Multicannon and Cannonballs
Blocks
A player can block up to 4 different slayer tasks from being assigned by spending slayer points. Below are some commonly blocked tasks.
- Turoth
- Kurask
- Spiritual warriors
- Spiritual rangers
- Dragons
- Banshee
- Desert Lizard
- Gorak
- Pyrefiend
- Waterfiend
Task strategies
| Monster | Alch runes? | Strategy |
|---|---|---|
| Bronze dragons | - | Change them, as their drops do not make up for the cost. |
| Iron dragons | yes | Change them if you do not have at least 80 in all combat stats. If you do have 80 in all combat stats, wear full Proselyte and use Protect from Melee while meleeing them. Anti-fire potions will help. You can also mage them using Slayer Dart or Fire Bolt with the Chaos Gauntlets, while using Anti-fire Potions to take no damage. This course of action is best if your mage is above 80. |
| Steel dragons | yes | Change them if you do not have at least 90 in all combat stats. Use the same strategy as with iron dragons. |
| Aberrant spectres | yes | wear a nosepeg and full black dragonhide, use melee and the protect from magic prayer if you don't care too much about individual herb drops and want the task over quickly. Another option is simply to change them. |
| Shadow warriors | no | Melee |
| Pyrefiends | natures only | magic-based melee attack, use full black dragonhide/whip or range if you are a lower level. |
| Basilisks | fires only | mirror shield, melee, Bones to Peaches is an option. |
| Trolls | yes | Trollheim, cannon is an option. Wear full rune and use melee. There is a cannon spot on Death Plateau, just behind one of the houses. Placing it in the correct location means you get to hit two Troll Generals as well, without ever being hit yourself, meanwhile using range. Just bear in mind this is not overly quick, and can be expensive. |
| Jellies | yes | Quicker to take second shortcut than go round to get to them. Uses a magic-based melee attack. Wear full black dragonhide and use melee. |
| Dagannoths | no | Go to lighthouse, use cannon, wear melee armour and use melee, but you'll spend most of your time filling the cannon rather than fighting, so bring range and super defence potions if needed. Fast slayer exp. You will lose money on this task (cannonballs), but growing the herb seed drops may mitigate the loss somewhat. |
| Dust Devils | yes | Melee, good task if you have a Slayer helmet on. If you do not own one, it can be a somewhat annoying task. Bones to Peaches is a very good helper on dust devils, unless you plan on using prayer or helm switching with guthans. |
| Gargoyles | no | Guthans strongly recommended because they hit hard, you'll need a nosepeg to get there faster using shortcut, and you'll need a rock hammer. There is also one safespot if you wish to range them. |
| Wall beasts | no | Need spiny helm, melee |
| Cave horrors | fires only | Wear full black dragonhide/melee. Fairly tough to do in a single sitting, so guthans should be an option. Requires a witchwood icon to melee them. They can be ranged from a safespot. |
| Hellhounds | no | Go to Taverley Dungeon, put cannon on upper floor, and it will hit the ones below. Preferably use full black and range the nearest one, there's plenty of hiding spots even on the upper floor. Level 3 clues *may* pay for the cost of the cannonballs if you're lucky. |
| Blue dragons | no | Range them. Blue dragons are worthwhile spending some time over, because they're a good money making/extra experience trip. Killing the dragons in Gu'Tanoth is recommended because they're less busy than the ones in the Taverley Dungeon, ranging them with a crystal bow is fairly fast and the hides more than pay for the recharge of the bow, and you get excellent prayer experience from them. Having your house in yanille can speed up banking/return trips significantly. |
| Jungle horrors | no | Change them, as they are tough and slow experience. Their drops are also poor. |
| Kurasks | yes | Changing recommended. If you want to fight them, ranging is recommended using broad arrows, there are 2 safe ranging spots there, and broad arrows are at least as fast as the leaf-bladed spear, especially when potted. The only downside is that this trip will cost you around 100k in broad arrows, but you'll make this back in clues/rune long drops/mystic bottom drops. If you use Broad-tipped bolts, you won't have too much of a problem with them. |
| Kalphites | yes | Melee, use cannon on the warriors in the cave where the potato cacti are found. You will lose money on this task (cannonballs), but pick up some potato cacti before you leave as these are worth significant amounts and are in relatively high demand from players training herblore. You could also range or Halberd the guardians outside of the Kalphite Queen's lair, as they give better loot and more experience, but are more difficult to kill. |
| Fire Giants | natures only | Go to waterfall area and set up cannon in main room, hide by the door and just watch the cannon do its work. Fast slayer experience. Almost certain money loss on this task, but you may get some rune scimitar drops to mitigate it, and if you're *extremely* lucky, a dragon medium helmet. |
| Elves | yes | If your combat is reasonably high or you need teleport crystals, do them (use melee), otherwise they should be changed. Best option is in Lletya because there is an altar and a bank close to the spawns for the elves. They have reasonable drops, but their defence is notably high, so this will be slow experience, unless you can deal significant damage with a cannon and/or dharoks. |
| Turoths | yes | Changing recommended. If you wish to fight them, use a Leaf-bladed spear. It is possible to range them using broad arrows, as there are 2 safespots you can utilise. Bones to Peaches is an option if you do decide to do them. Broad-tipped bolts are a better option instead of broad arrows. |
| Cockatrices | no | use mirror shield/melee |
| Bloodvelds | yes | magic-based melee attack, so use full black dragonhide/melee. Bones to Peaches an option. They don't have particularly good drops, but they're good experience as they have a high number of hitpoints, lowish defence, and don't hit particularly hard. Also, they can be ranged from behind the chair in the northeast corner of the larger room. |
| Werewolves | no (bank is close) | Either melee or range them. |
| Zygomites | no | They're only given out in low numbers, but they're worth doing because they're fairly close to Chaeldar. Use full black dragonhide and melee them. Need fungicide spray/reloads. |
| Nechryael | no | Use melee. The annoying death spawns can be avoided simply by running to the other side of the room or running around with the death spawn behind or on the side of the nechryael. You can use guthan's to heal on the spawns, and even use guthan's to heal on someone else's spawn if necessary. Remember a nosepeg or Slayer helmet if you go through the shortcut past the Aberrant spectres. |
| Black demons | yes | Hide in one of the safe spots in the Taverley Dungeon and use a cannon whilst ranging the nearest demon. This is tough to carry out as black demons hit extremely hard - taking a couple of prayer potions helps as well as some good food. You will lose a lot of money on this task if you're using a cannon. Their Rune chainbody drops may decrease the money lost from cannoning. |
Temporary boosts
- A Slayer's respite will boost slayer by 1. This can be brewed using the cooking skill.
- A mature Slayer's respite will boost slayer by 2. This can also be brewed using the cooking skill.
- A Wild pie will boost slayer by 5.
- A Black mask and a Slayer helmet will boost both Attack and Strength by 15% while fighting monsters that have been assigned to you by a Slayer Master. The masks have a number of charges, represented by a number behind them from 10 to 1. When you still have a charges, you will sometimes have your opponent's defence decreased. Each time this effect takes place, you lose one charge. When Black Masks lose all their charges, they have no number. There is no known way to recharge them, but the charges are not required.
- A Black mask (i) or a Slayer helmet (i) will boost Attack, Strength, Magic, and Ranged attacks and accuracy by 15%.
- Salve amulet (e) is useful when fighting any undead monster (Aberrant spectres, Banshees, Shades, etc. The bonuses do not stack with the effect of a Black mask.
The Salve amulet is a reward from the Haunted Mine quest. You can enchant it (making it a salve amulet (e)) by defeating Tarn Razorlor and using the book on the amulet. Black masks are available by fighting Cave Horrors in a cave on Mos Le'Harmless. When meleeing Cave Horrors, a Witchwood Icon is required.
Quests
- Royal Trouble - 5000 experience
- Wanted! - 5000 experience
- Animal Magnetism - 1000 experience
- Recipe for Disaster - 1000 experience
- Shadow sword miniquest - 5000 experience
- Killing Tarn Razorlor - 5000 experience
- Natural History miniquest - 1000 experience
See also
- Category:Slayer Monsters
| Support | |
| Gathering |
|
| Combat |
|
| Artisan |
|