Template:RSW
Details
| Start point | |
| Official difficulty | Experienced |
| Description | There are rumours of a secret passageway that can be used to get to the other side of the mountains west of Ardougne. Now it's just a matter of finding it. |
| Length | Very Long |
| Requirements |
Recommended: |
| Items required |
Recommended:
|
| Enemies to defeat |
|
Walkthrough
The Walkthrough for the dungeon AFTER completing the quest can be found here.
This quest relies heavily on your Agility skill, often making you complete a number of obstacles in succession. In most cases, failing any of the obstacles will cause you to return to the beginning, making for quite a lot of frustration, especially if your Agility is low.
Starting the Quest
Items required: None.
To begin, talk to King Lathas on the upper floor of Ardougne Castle. It's located near the south-west side of East Ardougne. He'll tell you about the underground pass and the evil Iban who guards it, claiming to be the son of Zamorak. He'll ask you to check in with Koftik who is waiting for you just outside the entrance of the Underground Pass.
This time, you'll be allowed to go right through the front gates to West Ardougne, so head through, and walk all the way west through the city until you find the cave entrance with Koftik standing outside. Talk to him, and he'll explain more about the Pass and tell you to meet him next to the bridge further inside.
Getting in and Across the Bridge
Items required: A bow, arrows.
When you walk inside, you'll see three paths branching off in different directions. Whatever you do, don't take the middle one! The swamp there will drag you down and send you tumbling down a very painful hillside you'll have to climb back up again. Instead, take the right (north) path. Climb over the rocks there to go around the swamp and get to where Koftik is standing next to a fire. Talk to him, and he'll tell you it looks like there have been others in the cave already. He'll give you a damp cloth. If you need, you can talk to him at any time to get more. Use the damp cloth on an arrow, then use the result on the fire to get a fire arrow, or a lit arrow if you used a bronze arrow. Equip a bow and this arrow.
Go north to get to the small area there. Look across the subterranean river, and you can see where the guide rope holds up the bridge. Click on it, and you'll fire your lit arrow at the rope. If you succeed, the bridge will drop and you'll automatically walk across the bridge. The lever next to you will drop the bridge and you'll automatically cross it, so do not pull it unless you want to leave. Getting back will take another arrow. Before you continue, take the plank north of the lever.

|
B - Giant bats |
The Pit and the Grid
Items required: Food (strongly recommended), a rope.
Walk south a little to where you should see a pit. Don't go into the swampy area with the Blessed spiders, or you'll be sucked down. Instead, walk east and walk to the north branch of the pit and look up above it. You'll see a bit of rock on the ceiling that you can use your rope on. When you do, you'll swing across. If you fail, you'll fall into the pit and have to climb up, then start again from the very beginning of the Underground Pass.
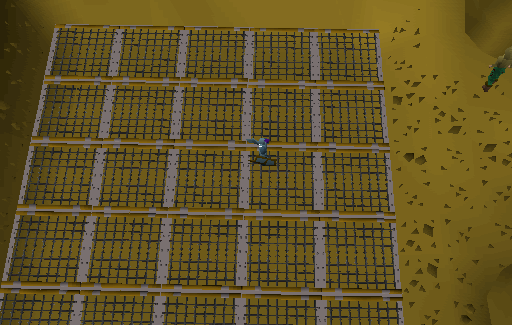

The grid.
If you do succeed, continue to follow the path until you see Koftik standing in front of a grid of mesh. This bit can be frustrating. You'll have to use trial and error to figure out which squares will drop you into a pit and which will support you. It's different for every person, so you'll have to figure it out for yourself. Make sure to remember what it is, since you'll need to come back this way again when you want to do Regicide. Once you finally do get through to the other side, pull the lever to get onto the other side of the gate.
A useful strategy on this part may be to map the right way using Paint (with the PrntScrn function or any screenshot-taking function) or a piece of paper, as you'll need to cross the grid several times.
*Not always true * It would also appear that the path across the mesh grid is the same as it is in RuneScape 3. If you've completed this quest in RuneScape 3 and remember your path, you CAN use that to make your way across.
The Orbs and the Well
Items required: A plank (optional but suggested).
To the north of you is a furnace. For the moment, ignore it, but remember where it is. To the west of you, will be a narrow corridor. Approach it carefully, as there are five traps (odd markings) in the wall. (There's two on the north side followed by three on the south side.) Right click and disarm them to get through, and be ready to heal if you fail. Or if your Thieving isn't high enough, just heal up as much as possible and run through. The traps can also be foiled by standing on the square right before the trap, and running to the square immediately after the trap with run on. Whichever way you choose, you will eventually get through into an area with a large, rather sinister-looking well in the middle and an altar. There are four different paths branching off from this room.
Note, attempting to climb down the well at this point will result in being hurt 10 damage.
- Start with the very north one. This will be the easiest one. Use the plank you picked up earlier on the flat rock to disarm the trap. Go past all three of the traps and pick up the orb of light at the end of the tunnel. If you didn't grab a plank, you'll have to disarm the traps, which is very difficult. Alternatively, if you stand stationary on the tile immediately adjacent to the trap and then run over to the tile on the other side, you will pass over the trap without setting it off.
- The next one (the next one to the left, north west) is fairly easy as well. Fight or run through the various spiders and level 53 Ogres to grab the orb and run back again. No real tricks here!
- Same as the first one. Use your plank to get over the traps, or try to disarm them. There's just more of the traps this time.
- Traverse through the tunnel. However, when you get to where the orb is, don't pick it up. Disarm the trap underneath it, or you'll get hit by a swinging log. Very painful!
Now that you have all four of the orbs, back track a little bit. Go back to where the furnace was (remembering to be careful of the traps in the wall). Use each of the orbs on the furnace to destroy them. When you go back through to the well again, you can now climb inside and drop down a level.
Items required: spade
Koftik will be here sounding a little bit strange. Plus, if you are running low on supplies, you can search the nearby crates to find a supply of 2 salmon and 2 meat pies to get you a little bit farther. Also, there's a rope spawn in the dead-end path to the north.
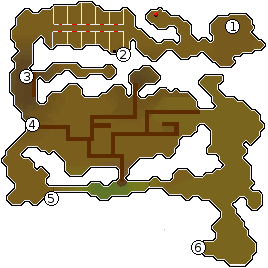
- Entrance from the first area via climbing down the well
- Dig by the mud patch with your spade.
- Narrow ledge
- Agility maze
- 50 Thieving shortcut to bypass the maze
- To the third area
The Cages and Obstacle Maze
Items required: Food.
Head further down the cave, and you'll find yourself in an area with a few cages. Pick the lock on the first one on the left (south-east). You'll notice that there's a rather odd looking patch of ground at the back of it. Use your spade on this to dig through and find a hidden tunnel that will take you through to the other side. Edge across the narrow ledge (you can fall, but it only takes off a few HP) and you'll be near a maze of raised beams. To get through it, you'll need to hop over a number of obstacles. If you fail, you need to climb back up one of the ramps nearby, often setting you back a few steps. To get through, take the first right, a left, and another left.
There's also another, much simpler way to get through. If you have 50 Thieving, you can go a little bit farther south. There's a door that you can pick the lock of. It completely bypasses the whole maze. You just have to be careful to avoid the places that are bubbling. Either way, go south and go through the entrance to get into the next area.
The Caged Unicorn
Items required: None.
In the next room, you'll find a group of skeletons and a unicorn in a cage. You'll need its horn, but you can't get into the cage to get it, so you'll need to figure out some other way. If you search the cage, you'll find a loose piece of railing. Take this and head up the path above where the cage is. You'll find a large boulder here. Use the loose railing to pry it loose and crush the poor unicorn. Now, you can go back down and retrieve the unicorn horn by searching the wreckage of the cage.
The Paladins
Items required: Food and combat equipment, 3 paladin's badges (red, blue, and green), and the unicorn horn.
Heading north through the cave, you'll come to a small group of Paladins who have made a sort of camp. They're all level 62, named Sir Carl, Sir Jerro, and Sir Harry. If you talk to Sir Jerro, he'll give you some more food to restock your supplies. Unluckily for them, you need the paladin's badges that they carry. And the only way to get those is to slaughter them. If you do need the food, make sure to talk to them before attacking them. After all, they won't be too happy with you for killing their friends. It is possible to safe spot the Paladins by attacking them and running just south where they will not completely follow you.
Once you have all three badges (red, blue, and green), head a bit west keeping your eyes out for the traps there. Again, you can foil them by placing the plank on them. Keep going west to where there's another well. Use the unicorn horn and the three crests on it to open the large doors.
Remember this well if you want to use the Iban Staff later. This is where you recharge it after use.
The Dwarves
Items required: None.
.png)
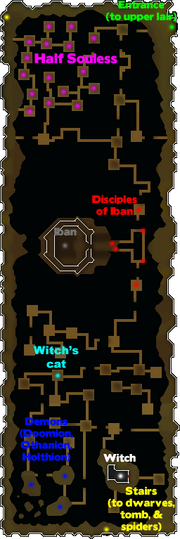
Iban's Lair
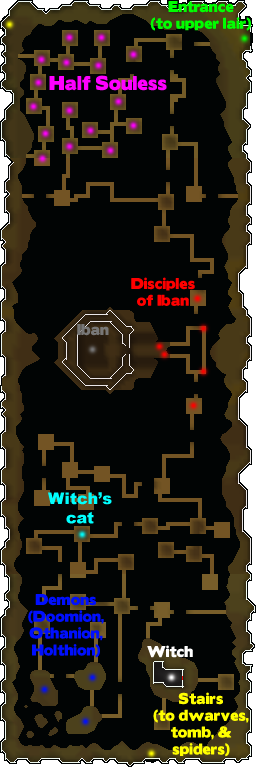
Now, you're in the largest area of the Underground Pass (and indeed all of RuneScape) and one of the most frustrating. Around all edges of the area is a rock ledge to walk on. The middle is a large, open area with a maze of walkways, most of which are broken. If you try to jump across them, sometimes you will fall and end up taking big damage when you hit the ground below, as well as being in a large area filled with Souless. Keep in mind that this area has been known to take well over an hour to clear, so be persistent.
For now, ignore the walkway, though do take note of the locations where you can get onto them. Head as far south as you can and look at the south wall to find a small staircase leading down. When you walk down it, Koftik will appear, ranting insanely before disappearing again. Before he goes, though, he'll mention some dwarves that have taken up residence there. Walk a bit to the west to find them. There are three dwarves named Niloof, Klank, and Kamen in a small fenced area with two buildings.
Niloof will give you some food when you talk to him. Kamen also gives an unlimited amount of food after you talk to him (see below).
The Witch
Items required: Patience (optional but strongly recommended).
Tip: ALWAYS keep your run turned on and at 100% when jumping,since the higher your run energy,the less chance of falling.
Note, the paths over the giant chasm don't appear on the minimap.

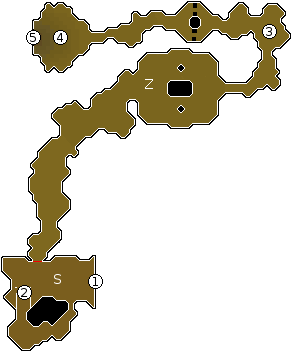
.png)
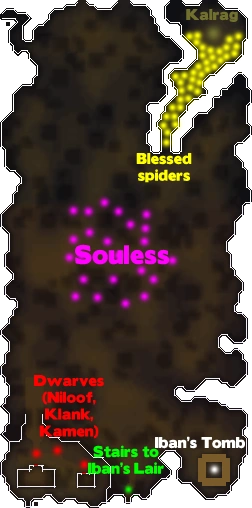
This is the level beneath Iban's Lair.
Talk to Niloof about a witch named Kardia who knows how to kill Iban. Once he's told you that, talk to Klank and ask about the souless. After he's given you the tinderbox, talk to Kamen, who will tell you he is a little fried and asks you if you want some of his brew (if you accept you will be hit 5 HP and your Agility level will go -3; however, he will give you some bread, stew and a meat pie). Climb up the staircase again and head a little to the north-east where you can see a house, from there walk a little north where you can jump onto a path. Walk along it and take the first turn south to find Kardia's house. Search the window and you'll hear her talking to herself about her missing cat. Head north, take a left, hop across the gap, then take the north branch of the path. Follow it until you find the cat. It will be a yellow dot on your minimap. Grab it and go back to the witch's house again. Use the cat on the door. You'll automatically hide behind the corner while the witch gets her cat. While she's distracted, sneak into her house and search the chest. You'll get a stat restore potion, a super attack potion, the history of iban (an old journal that relates some info about Iban), and a doll of iban. The doll is the most important part. You now need to collect four elements of Iban to imbue the doll.
Iban's Doll
These can be done in any order.
Iban's Shadow
Items required: Combat equipment, and the doll of Iban.
Othanian.
To get Iban's shadow, you need to kill three level 91 demons named Doomion, Othanian, and Holthion. Head west of the witch's house, and take the first left (south) all the way down until you reach where the demons are. Kill each one any way you like and pick up the amulet of Doomion, amulet of Othanian and amulet of holthion that they drop respectively. If you are a low level or are using range or magic, there are safespots for killing the demons by standing on the narrow pathways. Once you have all three of them, head just north of where Doomion was to the chest there. Opening it will destroy the amulets and give you Iban's shadow. Use it on the doll.
Iban's Body
Items required: A bucket, and a tinderbox.
Iban's tomb set ablaze.
Either fall or jump back to the staircase to get back downstairs. Go back to the dwarves and talk to Klank. He'll give you Klank's gauntlets and a tinderbox. Make sure you keep it. Next, grab a bucket from the larger of the two buildings if you don't already have one, and go into the smaller building. Use the bucket on the barrel inside one of the houses to get some of the dwarf brew that Kamen was giving you earlier. Take this and head to the far south-east corner of the area where Iban's tomb is. Note if you try to search the tomb, you will take damage. Dump the bucket of alcohol on top of the tomb, and light it up with your tinderbox. After you're done watching it burn, a pile of Iban's ashes will appear in your inventory (or drop on the ground) Use these ashes on the doll.
Iban's Blood
Items required: Food and combat equipment, and the doll of Iban.
Now for the fun part! If you're arachnophobic, you might be in a bit of trouble. Head straight north from the tomb, and keep going until you reach a corridor full of Blessed spiders. Walk inside until you find a giant level 89 spider named Kalrag. Kill him. When you defeat him, you'll automatically soak up the blood with your doll. Now, you might want to run, because all the spiders nearby will attack you. Despite not being a multi-combat area, they can gang up on you when you kill Kalrag.
Low levels might have a problem with Kalrag as the Blessed spiders keep attacking, preventing the player from attacking him. This can be avoided by running alongside Kalrag, killing Blessed spiders in the hope that Kalrag will be the next to aggro on you.
Iban's Spirit
Items required: Klank's gauntlets.
Now, make sure you put on Klank's gauntlets. From the spider den, head north-west to the far corner of the area. There's another staircase you can climb up to reach the upper area. Near you, there will be several cages with half-souless in them. Search every cage. (If you're not wearing your gauntlets, the half-souless will bite you and cause some damage.) Eventually, you will find the skeletal remains of Iban's dove. It could take a while, but when you find them use them on the doll.
Killing Iban
Items required: Zamorak robe top and bottom and doll of Iban.
Now, to finally destroy Iban and bring an end to this quest. You'll need to jump your way to Iban's temple in the very dead-center of the area. You'll probably fall a few times along the way, but keep at it. Once you're there, kill an Iban Disciple to get Zamorak robes. (They drop top and bottom every time, so grab a few more if you want). Make sure the robes are all you're wearing, then enter the temple.
The next part can be tricky. What you need to do is use the doll on the well in the center of the room. What makes it hard is that Iban will be launching spells at you. If any of them hit you, it sends you flying back to the door of the temple as you suffer damage and are stunned. When you do manage to get the doll into the well, though, Iban will be destroyed and the temple will begin to collapse. You will receive Iban's staff, 15 Death runes, and 30 Fire runes. If you do not have space in your inventory for anything else, you will receive Iban's staff but lose the runes you would have gotten since you are immediately teleported after placing the doll in the well and have no chance to pick them up. Should you die attempting to dispose of the doll, you will have to run through the entirety of the dungeon again, so be sure to bring the items required with you. Unfortunately, you will have to kill the Paladins again and get their badges a second time to enter the final area, so be prepared.
You'll be teleported to a cavern with Koftik, who'll be sane again.Talk to him to be teleported right next to the entrance. Leave the cavern and head back to Ardougne, and tell King Lathas of your success to finish the quest. Congratulations!!!
Rewards
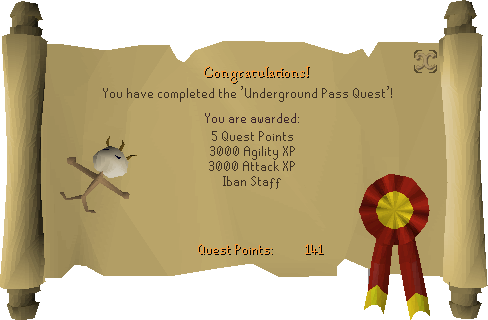
- 5 Quest Points
- 3000 Agility experience
- 3000 Attack experience
- 15 Death runes and 30 Fire runes
- Iban's staff and use of the Iban Blast spell.